I made this little journal for my friend who is going on a road trip this week. I thought I would throw together a quick DIY tutorial for anyone who wants to make this quick and easy little book.
What you will need:
* thick paper or cardboard to make into the cover
* paper for the inside pages
* a needle and thread
* scissors
* a pencil
* an exacto
* ribbon or some paper for the outer spine
* decoupage glue to collage the cover
Step 1:Gather the paper for your inside pages and give them a crease. (I used lined paper, drawing paper, and construction paper to give the inside of the book some variety for drawing and writing.)
Step 2:
Cut the inside paper to the same size as the cover so that none of your pages stick out the sides after the book is finished.
Step 3:
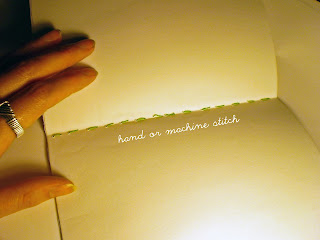
Open your folded papers and sew a running stitch along the crease-- this will become the spine of the book. It is up to you whether you want to sew the cover along with the pages or if you will glue it later. You can machine sew or stitch by hand. (if machine sewing be very careful about not breaking a needle.) Make sure your knots are on the outside of the spine so that you can cover them up with your ribbon or when you glue on the cover.
If you chose to stitch the pages separately from the cover you will now glue the cover to the outer two pages.
If you sewed the cover to your pages you will now glue your ribbon the the spine to make it pretty and cover up your stitches. You can also use a strip of paper for this step. I happened to have some scrapbooking ribbon with an adhesive back that worked like a charm!
Step 5:
Decorate your journal!! I love collaging anything I can :) so that is what I did with this little book. Here is were you will need the mod podge decoupage glue (I prefer the matte finish but the also make a gloss which gives a nice effect) and the exacto.
Lightly sketch the shapes you will need and cut them out with the exacto or scissors. I chose a station wagon and the word "travel" for the journal I made. Arrange the collage pieces on the front cover and use a small brush to secure them with mod podge, then add a coat on top of the pieces with the mod podge to seal them. Sewing on embellishments can be a fun detail too. I used some buttons for the wheels of my station wagon.
That's it-- you're done and you have a beautiful, unique journal for yourself or to give as a gift!


No comments:
Post a Comment